The Lerario: How a Sculptural Three-Leg Table Comes to Life (Step by Step)
Don't care how it's made? Buy it here.
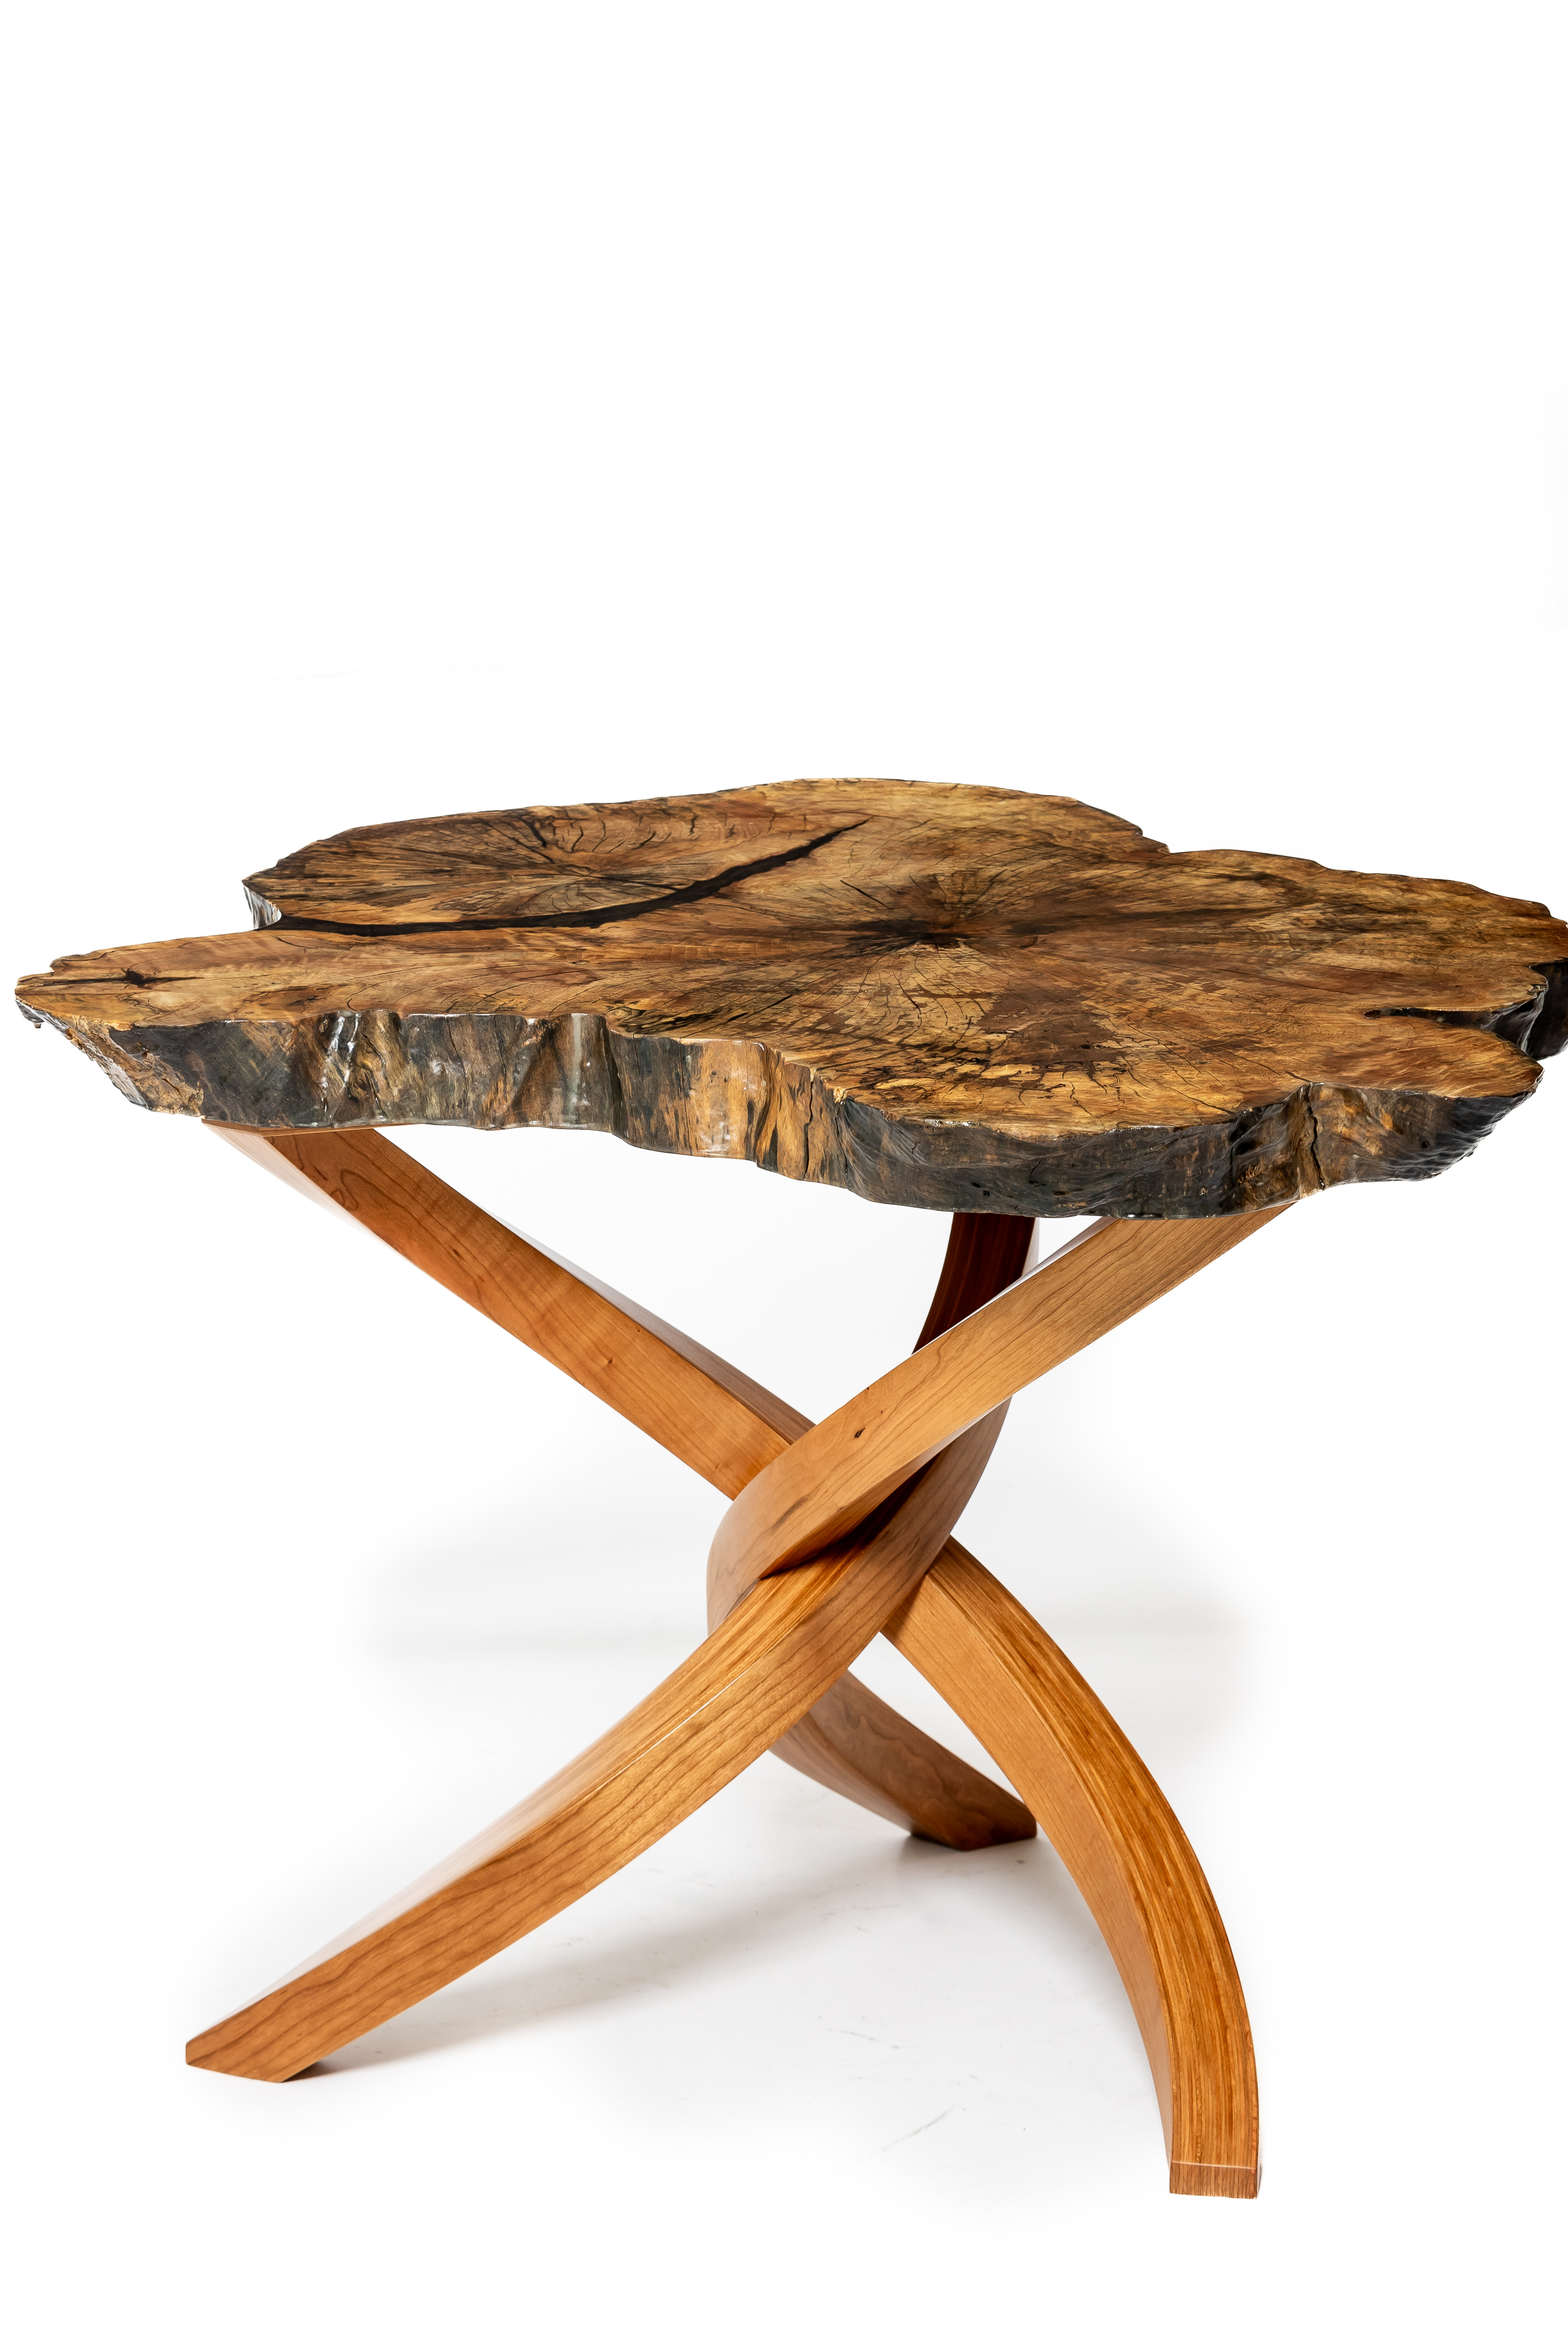
When a client asked for a three-leg end table with no straight lines, I saw an opportunity: build something that could function beautifully in a reading room while pushing the edge of what I believed I could do as a maker. That table became The Lerario, a piece built from flowing curves, engineered joinery, and an honest respect for the wood’s natural character.
Here’s the step-by-step process I used to bring it to life, explained in a way that highlights both the craft and the decisions behind it.
1) Start With the Design Problem: Three Legs, No Straight Lines
A three-leg table solves one problem immediately: it doesn’t wobble the way four legs can on an uneven floor. But the client’s request made it more challenging—no straight lines meant the base needed to feel organic and sculptural while still being structurally sound.
I committed to a design where the base would be the visual centerpiece: three curved legs with a sense of movement, built to support a natural slab top without looking heavy or conventional.
2) Build the Curves With Bent Lamination
The legs were made using bent lamination, a process where thin strips of wood are shaped around a form and glued together to create a strong, permanent curve. This technique lets you create smooth, continuous arcs that are difficult, or impossible, to carve from a single block of wood without weakness or waste.
For The Lerario, I used:
1/8" thick cherry strips
A half-cylinder form
Toggle clamps to apply consistent pressure during glue-up
The half-cylinder form creates a clean, repeatable curve. Toggle clamps are simple, reliable, and fast. This is especially helpful when you’re working with multiple strips and need even pressure across the whole lamination.
3) Choose the Right Adhesive for Working Time and Strength
Bent lamination requires calm, controlled assembly. When you’re positioning multiple strips and managing clamp pressure, you don’t want a glue that’s racing against you.
I used West System epoxy with its slower hardener. That extra working time allows you to align each strip correctly, ensure full contact, and avoid rushed mistakes that can show up later as gaps or weak joints.
Once clamped, the laminated parts cure into a single, strong structure—one that looks delicate but behaves like engineered wood.
4) Assemble the Base With Joinery, Not Screws
One of my goals with The Lerario was to keep the base visually pure: no screws or visible hardware holding it together. The strength comes from how the parts interlock and bond, not from metal fasteners forcing the structure into place.
That kind of build demands accuracy. Your glue surfaces have to be clean, your joinery has to land tight, and your alignment has to be intentional—because there’s nowhere to hide slop.
5) Level the Table by Scribing the Feet
Even a perfectly built three-leg base can sit imperfectly once assembled, especially with curved, laminated components. After the legs were glued together, I scribed the feet so the table would sit solid and true.
Scribing is one of those steps that feels small, but it’s the difference between “nice” and “professional.” It’s where the sculpture becomes furniture. Where the piece earns the right to live in someone’s home.
6) Stabilize the Live-Edge Top
This top had real character, but it also had real problems. Some areas were semi-rotten, and there was a large crack that needed reinforcement. Instead of hiding that history, I stabilized it and made it part of the final design.
First, I stabilized compromised areas with clear West System epoxy. Clear epoxy preserves the natural look while strengthening soft fibers so the surface can be finished and used confidently.
7) Reinforce the Crack With Bowties
For the large crack, I added bowtie inlays on the underside of the slab. Bowties act like structural “stitches.” They bridge a crack and help prevent it from spreading with movement over time.
My process:
Cut the bowties on a band saw
Use a router to remove most of the waste (especially helpful when working into end grain)
Clean the corners and final fit with a chisel
That combination of using the router for efficiency and the chisel for precision gives the best of both worlds: Speed and precision.
For material, I chose Gonçalo Alves, also known as Tigerwood. It’s strong, dense, and visually striking. The contrast between the Tigerwood and the slab makes the bowties feel intentional.
After installation, I left the bowties slightly proud and then flushed them to the surface with a Stanley No. 4 hand plane. This is one of the most satisfying steps in woodworking: the moment where separate parts become one continuous surface.
8) Fill the Crack With Black-Pigmented Epoxy
Once the bowties were secure and the crack was structurally controlled, I filled the crack using a deep-pour epoxy tinted with black charcoal.
Clear epoxy stabilizes. Black epoxy defines. It turns the crack into a feature; a bold visual line that reads like a natural vein running through the wood. It’s honest about the wood’s story while making that story beautiful.
9) Attach the Base With Threaded Inserts
Even though the base itself uses no screws or hardware to hold together, the top still needs a reliable connection that can be serviced if required.
I used steel threaded inserts in the maple top with1/4-20 bolts. The inserts were countersunk, and maple is dense enough to hold them securely.
If I were doing it again, brass inserts would also be an excellent choice, especially for corrosion resistance, but steel provides strong threads and a solid hold.
10) Finish for Durability and Clarity
For the finish, I sprayed M.L. Campbell Krystal, a catalyzed lacquer, using an HVLP system. Cherry doesn’t have an especially open grain, so I didn’t need a full grain fill, just a seal coat and clean build to achieve a refined semi-gloss.
On the final coat, a little dust settled on the live-edge surface, so I rubbed the top lightly with steel wool to knock down dust nibs and make the surface feel perfectly smooth in the hand.
11) Prove It’s Not Just Art—It’s Strong
A three-leg table will always be capable of tipping if someone loads the extreme edge—physics is physics. But for its intended purpose (an end table in a reading room), it’s stable and dependable.
And for a real-world strength test?
I stood on it.
The Lerario supports at least200 pounds, even while presenting itself as something light, graceful, and almost impossible.
The Lerario changed the way I see my own abilities.
It’s proof that woodworking can be both art and engineering; movement and structure; delicacy and strength.
When a client gives you full trust, you don’t just build a table, you create ART.
